


 Report an issue with this product or seller
Frequently bought together

Customers who viewed this item also viewed
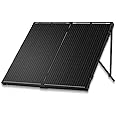
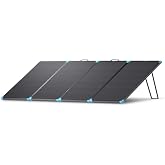
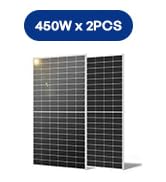
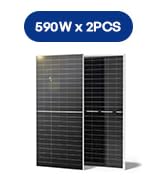
- Renogy 200W Portable Solar Panel, 25% High Efficiency Solar Panel Kit with 20A Charger Controller for 12V Battery Power Station, N-Type Foldable Solar Panels w/Tempered Glass for RV, Camping Off-GridFREE Shipping by AmazonGet it as soon as Friday, Jun 12
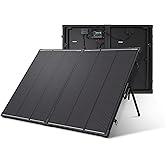
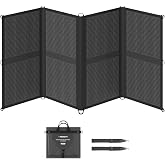
- Renogy 200W Portable Solar Panel, IP65 Waterproof Foldable Solar Panel Power Backup, Solar Charger for Power Station RV Camping Off GridAmazon's ChoiceFREE Shipping by AmazonGet it as soon as Friday, Jun 12
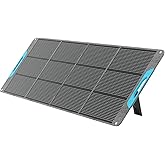
- Renogy 200W Portable Solar Panel, 25% High Efficiency N-Type Foldable Solar Charger for Power Station, with Adjustable Kickstand, USB-A Type-C Output, for Camping, RV, SUV, Off-Grid Outdoor HurricaneFREE Shipping by AmazonGet it as soon as Friday, Jun 12Only 4 left in stock (more on the way).
- Renogy 220W Portable Solar Panel Suitcase, 23% High Efficiency Foldable Solar Charger for Power Station, Durable for Decades, with Sturdy Kickstands, IP67 Waterproof for RV Camping Off-Grid BlackoutsFREE Shipping by AmazonGet it as soon as Friday, Jun 12
- Renogy 200W Portable Solar Panel Blanket, 25% High Efficiency N-Type Foldable Solar Charger for Power Station, Lightweight 8-Fold Space Save, USB-A Type-C Output, For Camping, RV, Pickup Truck, MarineFREE Shipping by AmazonGet it as soon as Friday, Jun 12
- Renogy 200W Portable Solar Panel, 25% High Efficiency Solar Panel Kit with 20A Charger Controller for 12V Battery Power Station, N-Type Foldable Solar Panels w/Tempered Glass for RV, Camping Off-GridFREE Shipping by AmazonGet it as soon as Friday, Jun 12


Product description

Key Features


Related Products
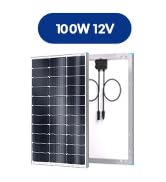
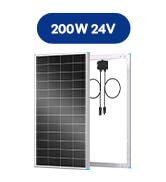
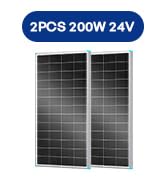
 200W 12V Solar Panels Kit |  200W Portable Solar Panel |  400W Solar Blanket |  400W Solar Suitcase |  100W Solar Suitcase |  AGM 12V 100Ah Battery |  Solar Charge Controller | |
|---|---|---|---|---|---|---|---|
|
Customer Reviews
|
1,374
|
659
|
102
|
214
|
38
|
2,215
|
3,837
|
|
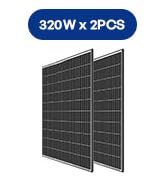
Max Power
| 200W | 200W | 400W | 400W | 100W | 12V 100Ah | / |
|
Cell Type
| N-Type | N-Type | N-Type | / | N-Type | / | / |
|
Cell Efficiency
| 25% | 25% | 25% | 23% | 25% | / | / |
|
Open-circuit Voltage(VOC)
| 21.47V | 21.6V | 39.2V | 47.2V | 21.6V | / | / |
|
Optimum Operating Voltage
| 18.65V | 18.8V | 33.6V | 40V | 18.7V | / | / |
|
Short-Circuit Current
| 11.89A | 11.3A | 13.1A | 11A | 5.83A | / | / |
|
Optimum Operating Current
| 11.05A | 10.6A | 11.9A | 10A | 5.4A | / | / |
|
Folded Size(IN)
| 34.25 x 22.83 x 3.15in | 23.72 x 22.99 x 1.97 in | 16.54*15.83*4.13in | 27.9*33.7*3.2in | 20.6* 24.6 * 1.6 in | / | / |
|
Unfolded Size(IN)
| 34.25 x 45.87 x 1.57in | 87.80 x 22.99 x 0.12 in | 64.96*62.99*1.50in | 111.8x33.7 x0.8 in | 41.3*24.6*0.8in | / | / |
|
Weight(lbs)
| 28.46 lbs / 12.91kg | 13.89 lbs / 6.3 kg | 16.09lbs / 7.3kg | 30.2 lbs / 13.7kg | 8.86 lb / 4.02kg | / | / |
Product Videos
From the brand

-

-
TOP POWER PICKS
-
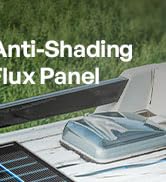
200W Shadowflux Solar Panel
-
100W-400W Portable Solar Panel
-
Portable Solar Panel
-
More Power, Less Space
-
100W-400W N-Type Solar Panels
-
Flex Your Power Freely
-
50W-200W Flexible Solar Panels
-
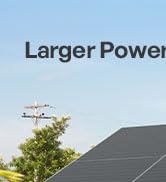
Larger Power, Less Space
-
High Watts Solar Panels
-
Sun to Power, All-In-One
-
200W Starter Solar Kit
-
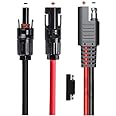
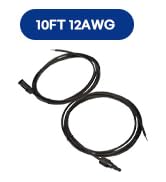
Various Adapter Wires
-
Reliable Service & Support


Product information
Warranty & Support
Feedback

Similar brands on Amazon


Customers say

Select to learn more
Have 2-200 Watt and 1-100 watt suitcase solar panels
Top reviews from the United States
Have 2-200 Watt and 1-100 watt suitcase solar panels
Reviewed in the United States on January 16, 2023

Have 2-200 Watt and 1-100 watt suitcase solar panels
Reviewed in the United States on January 16, 2023Renogy 200-watt solar suitcase notes
-Two Year Ownership Update at Bottom, July 2023-
Quick notes on things to watch out for:
- B01 error on controller. Indicates a wire is disconnected somewhere between the controller and your battery, on either the negative or positive side. Most likely loose at the controller but can also occur from frayed wires at any of the ( non-strain-relief-protected) MC4 connectors or clips at battery. Same code you get before connecting up to batteries.
- The maximum power I have seen with this suitcase is 164 watts, 11.4 amps at 14.4 volts. This is with 2 12V 65 Ah AGM batteries. You may get more output if you use a MPPT controller instead of the built in PWM controller. You also may not get maximum output if your batteries are lightly discharged.
- The note about connecting the battery first, then the controller second does not apply, since the wires are already connected to the controller. The instruction about connecting the battery first comes from the controller manual which is also sold stand-alone. Renogy says the battery does not need to be connected first when the controller is integrated in the suitcase solar system. The 100 watt suitcase solar system does not have detachable cables between panels and controller like the 200 watt system. What I do is turn the panel away from the sun while hooking up to the battery. This minimizes the controller power output.
I first connect the MC4-to-alligator clips cable to the battery, then typically 40-foot 8AWG extension cables, then connect extension cables to controller output MC4s. Then turn the panel around to face the sun.
I really like this unit. I have purchased 2 200-watt and 1 100 watt versions over the past few years. Last 200-watt purchase June, 2021.
I had the 100 watt suitcase first and wanted more power. Then I tripped moving the first 200 watt and broke one of the panels, oops (Renogy, replacement panel?)
I have used this 200-watt panel with 40-foot, 80-feet, and 160-feet (2-40s and 1-80)of 8 AWG Windy Nation MC4 cable. The max amps I got were:
40 feet: 11.4
80 feet: 10.4
160 feet: 9.4
Note: I bought another Voyager 20A controller to use at the battery end at the 160 foot length as I anticipated the voltage drop from the panel-mount controller would be too great to charge the batteries. Max panel voltage output is 21+ V so more voltage to handle the drop.
It was great to have the 160-foot cable distance. We were at a high alpine lake in deep shade and had the 200-watt solar suitcase on the lakeside beach (1/2” cable locked through carrying handle to some large stacked rocks). Enough amps to run our motorhome furnace in the cold and clear morning.
Our daily charging while dry camping starts early as I usually leave the panel out pointing where the first sun will occur (cable locked) overnight. The current draw of the controller is minimal, 0.008 A. The controller voltage will display what the current battery voltage is, for us usually 12.7 V in the morning (fully charged is 13 V for our AGMs). The charging voltage and current will gradually rise as the sun comes up. At an initial 10 Amp current the voltage will rise to an initial 13.5 V typically and continue to rise from there. Once the max voltage for the battery type is reached( in our case 14.4V) the controller output amps will start dropping as the battery accepts steadily less current as it nears full charge. I try to keep the panel pointed at the sun from early morning and get the charge current down to 4 A, then the aim is not critical and can rotate panel 60 degrees to the west and maintain 4A current and fully charge batteries over the next few hours. We can take off hiking, etc. and when we get back we’ll have a full charge. (Control displays ‘FUL’ and voltage idles at 13.6V, our idle current is around 1A).
I like the weight and water resistance of the panel. I have had the panel out in 40 MPH winds and rain with no issues.
I recently bought a Bluetti EB55 Portable Power Station and unplug the MC4 connector from the Renogy controller and hook up to the Bluetti MPPT input. Works great.
The 100-watt panel had some wear issues. The cables at the MC4 connectors have no strain relief so they tend to fray over time. The cables at the controller have no strain relief so moving the controller back and forth flexes the wires so they eventually fray. And I would slide the panel around on a tarp to keep the panel out of the shade and pointed at the sun and that flexes the legs. The upper end of the legs has just a metal nut press-fit in a plastic block so it got wobbly.
Don’t do what I did, pick up the panel to move, and hold the wires gently to prevent flexing.
Additional note on panel solar output: Panel output is optimistically rated with the ‘STC’ rating. Cell temperature: 25°C Irradiance: 1000 W/m² Air mass: 1.5
Same with home solar (we have 9000 watts of home solar).
The ‘NOCT’ rating is more realistic but lower power:
Air temperature: 20°C Irradiance: 800 W/m² Air mass:1.5 Wind speed: 1 m/s
Photos are of the 200 watt (L) and 100 watt panel. On this trip I would charge the motorhome house batteries until the charge current on the 200 watt panel dropped to 4 A, then put the motorhome on the 100 watt panel and switched the 200 watt panel to charge power stations.
-Two Year Ownership Update July 2023-
200-watt panel still going strong and using older 100-watt panel also. On the 200-watt panel a negative wire at the controller output to battery broke off just a few days ago so I had to screw it back in with a Phillips screwdriver. I carry tools on the road so not a big issue. Got the dreaded B01 error while moving panel. Longer term fix may be to attach spade lugs to the end of the wires and perhaps heat-shrink tubing to prevent flexing. One leg is a little bent but unit is not wobbly.
We have got a good 80 nights of use over 2 years approximately. We do a lot of dry camping.
Using the even older 100-watt suitcase too. It had wire fraying at the alligator clips and at one or more of the MC4 connectors. Got a replacement alligator clip assembly from Amazon and replaced the wires from controller to MC4 with Windy Nation 10 AWG 3 foot MC4 cables.
Added an Ecoflow Delta 2 power station. Charges from the 200-watt Renogy at 165 watts at 75F and 150 watts at 90F with 10 AWG XT60 to MC4 cable I bought from Amazon, 40 foot 8 AWG cable attached to MC4 cables detached from suitcase controller. The Bluetti EB55 has a max of 8 amps input so it maxes out at 130 watts.
152 people found this helpfulAwesome Product for Off-Grid Camping
Reviewed in the United States on December 4, 2025One person found this helpfulDurable
Reviewed in the United States on March 23, 2025


Durable
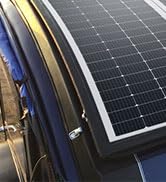
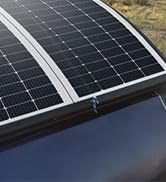
Reviewed in the United States on March 23, 2025I purchased this Renogy solar folding panel as a addition to my RV's existing 1000 watts of Renogy solar panels
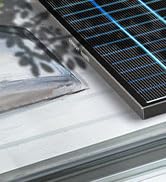
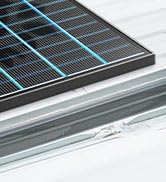
The panel is built with a sturdy aluminum frame.
The panel is made of a non flexible material. This makes it a bit heavier but more durable for long term exposure to the outside elements. I camp 6 months of the year and these will be exposed to the sun, wind rain, dust, and hail.
It has a strong carrying handle that folds out of the way when not needed.
It has two latches to secure it shut and a strong padded protective bag for storing when not is use.
Setting it up is pretty easy.
It has a included instruction manel.
The two panels unfold and are secured together by connecting hinges.
You pull out the legs and adjust them to your desired angle to the sun then tighten the knobs to secure the angle.
There is a 20 watt PWM solar charger connect to the panels that you set for the type of battery you have.
It comes with a 9 foot extension solar cable, with alligator clamps on one end, that to connect to your battery first then plug the other end of the cable into the panel's solar charger.
Aim the panels towards the sun and it will start start charging your battery. The amount of charging amps/watts will vary depending of how cloudy the sky is. Keep in mind that objects (trees, building, chairs) between the panels and the sun will also effect the power generated by the panels.
If you have a solar generator, you can bypass the solar controller to connect directly into your solar generator.
These are a great set of panels when portability is need.
9 people found this helpfulSolid product with a couple of shortcomings.
Reviewed in the United States on February 23, 2020152 people found this helpfulSimple setup, lots of power
Reviewed in the United States on August 17, 2021


Simple setup, lots of power
Reviewed in the United States on August 17, 2021If you are like me, then this may be your first venture into solar power and you may have a few things to learn, so I am doing my best to write this review with you in mind. This is for the 200W solar suitcase, but you can probably just cut the Amperage and Watt values in half for the 100W suitcase.
First, it’s pretty heavy. Don’t plan on whipping it out and flipping it around. But, I knew that when I bought it. It’s 35 lbs. For me, that doesn’t make it unmanageable by any means. It’s still pretty easy to open up, adjust the tilt, and spin it around for better sun exposure.
As far as performance, as you can see from the photos, I was able to get values that actually exceed the specifications, and on the two cloudless days that I had, I was able to get 11+ amps for most of the good daylight hours, from about 11am until 5pm, and that is in Michigan in mid August. Keep in mind that I was also reorienting the panels at least every couple of hours to keep them fairly close to perpendicular to the sun and making sure I didn’t end up in the shade. So, from the pictures provided, I got 157 Watts (11.5A x 13.7V) with the supplied PWM controller. Realistically, that’s about as good as you can expect with a PWM controller. Well, except in certain situations like in the last photo. Due to something called the “edge of cloud effect,” I briefly got 13.2A output, which far exceeds the 10.5A spec. But that is a brief occurrence and obviously only happens when there are clouds which otherwise obstruct the panel’s cells.
Keep in mind that the supplied PWM controller will reduce the voltage from the panel (optimally 18+ volts) to match the voltage of battery being charged. So, if your battery is at 13V and you are producing 11A, your total Watts will be 143. But if your battery is depleted at 11V, you will only produce 121 Watts at 11A. That is where a more expensive (and probably much larger) MPPT controller can do better, and will produce the same amount of power (in Watts) regardless of the battery charge. Additionally, an MPPT controller (like the Renogy Rover) can produce quite a bit more power than a PWM when the panel voltage is near optimal. Is it worth it? If you plan to extend your system, it may be worth getting an MPPT, but unless you need every single watt from these panels, it’s probably not.
Finally, what about on cloudy days? What can you expect? On a dark cloudy day, I was typically getting 0.5A or less (about 6W). On bright cloudy days (like the sun is shining everywhere but you have a cloud where you are) 2-3A was pretty typical. In general, figure about 1A for a cloudy day and similar values around sunrise and sunset. Yes, solar panels do produce power on cloudy days, but at about 1/10 of what is possible on a sunny day. The upside is that you probably don’t need to reorient the panels since the whole sky is equally bright.
If you have a 100Ah lead acid (flooded) battery, you will be able to charge it from 50% to full (or pretty darn close) on a good sunny day with the 200W suitcase. In June or July, or perhaps in other places in this planet, you could do even more, especially if you keep it pointed at the sun. But don’t expect miracles. Additionally, you can simultaneously charge a battery and run an inverter to power things. A lot of people don’t know that. During a power outage, I used it in combination with a 500W pure sine wave inverter to watch TV, which was drawing more power from the solar system + battery than it was producing, so it simply drew the extra from the battery. Nothing special, that’s just how electricity works. Without the solar, it would have depleted the battery much, much faster.
This may be too simplistic a review for some, but I hope I have been able to detail what to expect for people who may not be familiar with solar. That was me a month ago.
33 people found this helpfulWorks, but worth taking some care in use
Reviewed in the United States on November 2, 2020
Works, but worth taking some care in use
Reviewed in the United States on November 2, 2020TL;DR: Works well with our small camper.
MANY THANKS to Amazon for the free overnight shipping on this panel, the extension cables, and the adapter. We ordered this on the day our power went out during a tropical storm -- 850+ outages just in our county, thousands of trees down, 5 million w/o power statewide. The panels showed up the next day and we could keep the 12v fridge in our camper going. Power was out for 4 days.
REVIEW:
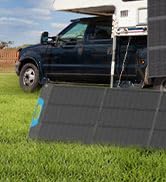
Our camper runs on 12 volts - refrigerator, furnace, hot water, lights, water pump, everything. So we can boondock (camp w/o hookups) as long as the batteries last. I wanted a solar array to keep the batteries topped off at music festivals, in park service campgrounds, etc. And, of course, during power outages. After doing some research online, I decided on this Renogy 200w panel with the 20amp controller. There is a "Zamp" brand solar input port on the camper, which I wanted to use. Here are some thoughts on what I purchased:
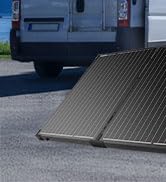
Renogy 200 watt mono suitcase solar panel. It's large and noticeably heavy, and also fragile, so take some care in carrying it and setting up. It comes with a heavy canvas case with a zipper, and a spring loaded carry handle. The panels set up with two lightweight aluminum legs and twist-tighten locks. Make sure they are tight.
Voyager 20amp solar controller. The power output from the two panels goes into the controller, then out to your battery(s). The controller is attached to the back of one panel with a hinge, and a piece of Velcro keeps it from swinging -- pull it off the Velcro to hang vertically so you can see it. From what I can tell, this is a pretty good controller. Not the best, but not bad.
There are two standard MC4 solar connectors on the wires running from the panels to the controller. UNCLIP THESE. The controller must be connected to the battery(s) FIRST, then to the panels.
There are two wires coming out of the controller, marked on the controller as BATTERY. These go to your battery. The red one should be connected to the positive side of the controller -- it's marked. Black on the negative side. ***This is where it is super important to start paying close attention to the wires and where they go.***
You'll need some extension cables, 8 or 10 gage. The included cables are pretty short. If you want to hook up directly to the battery, you can use the included alligator clips -- they are huge, like a jumper cable. Make sure you hook up positive to positive on the battery.
If you want to use a built-in solar port on your camper, this is where it gets tricky. You'll need an adapter cable that can connect to the standard MC-4 solar connectors on one end (coming from the controller) and into the SAE port on the other (into your camper.) NOTE THAT SOME SOLAR PORTS ARE WIRED IN REVERSE OF THE STANDARD. I looked over the wiring diagram for my camper, then took off the covers to confirm exactly which side of the port was positive. I purchased the iGreely Solar Panel to SAE Adapter, and it came with a "polarity reversing" dongle which I ended up needing to use. (https://www.amazon.com/gp/product/B07K8GMRDJ/) Just carefully follow the positive wire from the controller, to the adapter cable, and to your input port -- then see if you need the polarity reverser or not. At some point the color of the wires may switch, so pay attention. I taped the wires to show polarity.
Once you know the polarity and how it will connect, connect the controller to your battery. Check to make sure the proper battery type is selected. Ours defaulted to AGM, which is probably the most common "house" battery in a camper. Then set up the panels and reconnect the controller to the panels. You'll see the display show how many amps are being generated. You can click a button to toggle through volts and total amp-hours.
Take it down in reverse order -- disconnect the panels, then the battery, and put it all away.
240 people found this helpful**UPDATE**. Read THIS!! Avoid the hassle…
Reviewed in the United States on January 24, 2024


**UPDATE**. Read THIS!! Avoid the hassle…
Reviewed in the United States on January 24, 2024Hello shoppers!
Luckily (or unluckily) I purchased this item 2x. I needed 400 watts of solar to charge my lifepo4 batteries. I thought having them on the ground would make life simpler because if they are mounted flat on the roof of my van they are only optimally positioned for summer. The rest of the year (and depending on my location) mounted flat means diminished production of energy.
Now you know why I bought these, and I can give a second review of the product.
These panels are ‘ok’ but that’s where my praise ends. Renogy will tell you that when using wire to go between solar panel and mppt controller the wire gauge at minimum should be 8awg. HOWEVER they wire these panels with 12awg wire. In fact when I asked Renogy if they sold any other gauge wire they said “No, but you can make them yourself.”
Which means that if you spend $450 on the assembled product you can spend a whole lot more getting a heavier gauge wire. The 12awg is fine so just ignore Renogy’s suggestions.
On the back of the panel is the ‘waterproof’ housing for the wire connections. It’s a plastic box that has a tiny rubber gasket that likes to fall out when you open the box to examine the wire. My suggestion…. Pay attention to the gasket if you open!
The wire inside is soldered in place and there is NO strain relief measures on the wire. This is a fatal flaw because of the constant connecting and disconnecting at the mc4 connection. In less than a year my mc4 connectors were coming free from the wire and the copper strands were exposed. After replacing the mc4’s 3 times the panel just crapped out and ceased to work.
The legs that are attached inside the back of the panel are constantly coming loose. The nuts continually back out and fall to the ground. This is because the legs are positional and the constant set up and take down loosens the bolt. It’s a lousy design.
Additionally the legs are useless here in the southwest (Arizona) in the summer. Because of poor design and positioning the panel needs to be set up with its back end lifted fewer than 7”!! If you try to use the legs to achieve this angle the legs will cut the aluminum panel housing. That’s right…. You’ll need to use something to prop it up just off the ground (think 2”x4”). Rocks will scrape the black pain off of the housing.
There are no tips and trick’s accompanying the panels so you’re on your own to figure out how to get the most out of the panel.
I am having to ship this 35 lb suitcase back to Renogy to find out what failed. I’ve been lugging around a defective suitcase for over a month while Renogy makes me jump through unnecessary hoops!
On that subject these panels are kinda heavy. You can get used to the weight but setting up and taking down is aggravating when you’re only stopped somewhere for the night. When you’re camped somewhere for several weeks it’s not bad.
The framework of the solar panel surround is about 1 1/8” wide all the way around. It collects mud, muck and debris from whatever you set it on…. I highly suggest you lay out a ground tarp to keep them clean.
The panels are shipped in a ‘formed’ zipper bag to protect the solar panels when not in use. Renogy sent me one that has a bad zipper. That means I had to devise a way to force the cover/ case to stay on. I found 1” nylon strap and buckles did the trick but it was another $10-15 investment. When I notified Renogy of the problem they essentially said ‘too bad’ they actually said “we don’t have replacements we can send out”. Well I’d it’s included as part of the whole product and I spent $350+ on it, it should function correctly otherwise why bother shipping them at all?! This leads me to the biggest pain in the behind…. Customer service.
Renogy only allows American English speaking people to sell their products and only allows people of other nationalities using thick accents, speaking their countries iteration of English to handle Tech support.
When you deal with them (and you will eventually) you’ll discover they know absolutely nothing about the products or their technical aspects. They will repeat everything 3-5 times and not listen to your questions. They tell you that they are hearing your “concerns” but they can’t address them beyond whatever script they are reading. So if things get ‘technical’ be prepared for absurd chatter and repetitious gibberish and disingenuousness concern.
Renogy makes an average product serviced by inept phone people. You’re better off buying from one of the other companies with higher rated customer service and tech support.
If I knew when I bought this ‘briefcase’ what I know now….. I never would have bought two…. Or even 1!!! I took a chance on this company thinking the other people who have outlined similar failings might have been isolated cases….. I was wrong in doing so.
Take it from me, it’s not worth the 🤕 headache!! Install roof top panels on your van etc and put adjustable risers on them to catch the rays you need. It’s simpler and this stuff was not meant to be handled as often as ‘mobile panels’ are. If it was it would have been better built and proper tech support offered in the event something went wrong.👎👎👎👎👎👎👎👎👎
Caveat Emptor fellow shoppers.
**UPDATE**
1 suitcase failed and I sent it back to Renogy. That’s the easy explanation. Truth is I sent it back (at my expense -not cheap) on January 29th 2024 I finally got a replacement about a week and a half ago (today is Easter 2024). After talking to Indian representatives who don’t understand American English and are extremely difficult to understand on the phone (20-30 calls) I was lied to, misinformed, had incorrect items shipped to me, and nearly unable to make the problems understood to them. They never fixed the unit i sent back and when I received the replacement (mid March) they neglected to tell me the panel had been changed in dimension etc.
Why does this matter? I mean hey I got a replacement right?! Well look at the pictures I posted above. An additional defect is that because of the legs a decent wind will blow them over. In the desert this means it slams on to rocks and shatters. You’re probably thinking well yeah they broke- you should have been more careful! You’d be right. The fact that a gust of wind came along and blew them over is on me because I didn’t bring them in. BUT….. this was thankfully the old version. Which is about a foot shorter than the new version. Which makes them blow over in even lesser breezes! Now I spent $350ea for my briefcases and a look at current pricing is over 89$ more. If you have money to burn you’re luckier than me.
Now I mentioned how in Arizona in the summer the legs on the original briefcase was useless because to catch the rays the briefcase had to be laid nearly flat on the ground. The legs don’t allow for this position so you need to lay them out flat. The newer version being taller means even greater difficulty in lowering the panels to optimal summer position.
In short, I hate these panels. The briefcase that crapped out lasted 8 months… I use them daily and rely on them for 100% of my power needs. A breeze blew over the second set and I can’t afford to replace them. The bolts holding things together are constantly backing out and need to be tightened but each time you move the legs they loosen even more.
With no way to keep the new panels from blowing over I can add wind to snow, rain & clouds that defeat the panels. On a perfectly sunny day with wind I can’t put them out to charge my batteries. I now need to wait for a perfect sunny day with no air movement.
Also and more importantly these panels require huge investment of time to maintain. They have to be cleaned before putting them away, dirt and mud fills the channel on the backside of the panel, bolts need re tightening after every use, and worst of all is the enormous wasted space inside a vehicle to store them. (I had two briefcases so I had double the consumed space).
Roof mounted panels may be hard to install but take it from me they’re far cheaper to Mount….. you don’t have to clean mud dirt and ground debris from them after every use….. and wind won’t blow them over to shatter. They are always collecting power wherever and whenever you are -Solar briefcases require that you take them out if you want energy! oh and it’s important to note…. You need to store these panels upright. Otherwise going over bumps, potholes etc might slam a prone panel on the ground and shatter them.
Learn from my experiences and permanently Mount panels to your roof. Less work and constantly bringing in energy. Cheaper and oh yeah they weigh less- the briefcases are almost 40lbs each!!!
Never say you weren’t warned.
I will say this…. On the occasions when I can put them out…. The panels do work well. Sad but true.
CAVEAT EMPTOR!!
98 people found this helpful


Top reviews from other countries
- james tui
It's changeable but will void your warranty
Reviewed in Australia on March 6, 2022


It's changeable but will void your warranty
Reviewed in Australia on March 6, 2022I received my 200 watt panel from renogy. It's built tough and looks good. I read many reviews about this 200 watt renogy suitcase model, before I purchased this. I watched Youtube video reviews and priced checked other sellers and Amazon was the cheapest so I decided to purchase one. When I unboxed it, it was a little heavy but manageable. Nice case and I was impressed with the build quality super strong. The latches I don't see as a problem, as I've read many reviews about people saying the latches need to be upgraded. I disagree. The only thing I didn't like was the PWM so I changed mine to a 30A MPPT controller. Don't do this if your worried about your warranty, because you'll void your warranty. It doesn't bother me is the reason I changed mine. The MPPT fitted as you can see in the picture and it performs much better then the PWM controller. The fuse needs to be changed in the supply line as it comes with a 10 amp not 20 amp. Other then that it's a good suitcase panel it serves its purpose and I'd recommend this to others.
- Gustavo
Excelente opción
Reviewed in Mexico on May 9, 2025 - Eric
Set and forget power, weather permitting.
Reviewed in Australia on May 8, 2024
Set and forget power, weather permitting.
Reviewed in Australia on May 8, 2024Cannot believe the power output during a good sunny day. Topped up my battery in the power box from which I was running fridge, charging camp lights and mobile phone. Battery got to 100% and it stayed that way until sunset. A little heavy to move around freely so be mindful where the panels are stored to provide less strenuous access. Plug and play basically.
- Alfonso Garcia
Excelente equipo
Reviewed in Mexico on July 1, 2023 - Tapatio
Esta muy pesado
Reviewed in Mexico on April 16, 2024

